
Azure Cloud Shell is a web-based terminal that can be accessed from anywhere with an internet connection. It can be used to create and configure resources in Azure. Azure Cloud Shell provides pre-built tools like Bash, Azure CLI, and Azure PowerShell, which can be used to automate tasks by running scripts, debug applications and simplify the process of managing Azure resources.
Azure Cloud Shell comes with pre-installed text editors like code (Cloud Shell editor), Vim editor and Nano editor.
Cloud Shell supports the following programming languages:
- .NET Core
- PowerShell 7.2
- Python 2.7 and 3.7 (default)
- Node.js 8.16.0
- Go 1.9
- Java 1.8
- An active Azure subscription and a Azure storage account are required to set up Azure Cloud Shell.
- RBAC access on Azure Resources.
Steps to set up and configure Azure Cloud Shell:
Step 1: Login to Azure Portal >> access or launch Azure Cloud Shell from top right corner of the Azure Portal.
You can also use Azure Cloud Shell directly from https://shell.azure.com/ if you don't want to open Azure Portal first.

Step 2: Select either Bash or PowerShell of your choice

Note: You can change shells any time via the environment selector in the Cloud Shell toolbar. The most recently used cloud shell environment will be the default console for your next session when you open.
Step 3: Azure Cloud Shell requires an Azure file share to persist files for that we need a azure storage account. Click on "Show advanced settings" to create a storage account.
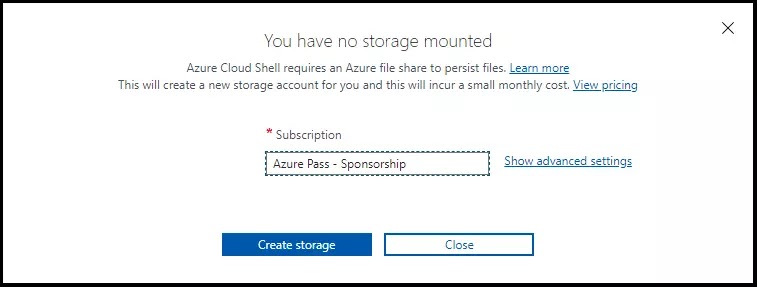
Step 4: Create a Storage File share and mount to could shell to store files and to execute files from console.
- Subscription: select your active azure subscription account
- Cloud shell region: select your cloud shell azure data center region.
- Resource Group: create a new resource group or use an existing resource group if you have any.
- Storage Account: give a new storage account name
- File Share: provide a name to file share to create a new file share in the selected azure storage account.
Click on Create Storage.

Once the storage account is created it looks like the below result. Now one can launch Cloud Shell from the top navigation of the Azure portal.

What are the benefits of using Azure Cloud Shell?
- Azure Cloud Shell is free to use and it is a web-based shell, so you can use it from anywhere.
- It comes with all the popular command-line tools pre-installed.
- It's integrated with Azure, so you can easily create and manage resources directly with RBAC access.
Is Azure Cloud Shell Actually Free?
Azure Cloud Shell runs on a shared machine provided by Azure. This means that the compute cost is free. However, Cloud Shell requires a new or an existing Azure Files share to be mounted in order to persist files across sessions. Storage costs will be incurred for the data stored in the Azure Files share.
Learn Azure Cloud Shell Commands with Examples:
Simple way to manage Azure resources is by using Azure Cloud Shell. Let's see some examples of Azure Cloud Shell commands.
Commonly Used Azure Cloud Shell Commands:
- Use command pwd to check the present working directory in your azure cloud shell console.
- Run ls command to list the files in the present working directory.
- Run ls -l command to long listing the files in the present working directory.
- Run ls -a command to list the files in the present working directory including hidden files.
- Run ls -al command for long listing the files present in working directory including hidden files.
- Run clear command to clear the cloud shell screen.
- Run az login to login with your respective azure account
- To do copy/paste in cloud shell select and use ctrl+c to copy and ctrl+shift+v to paste.
- Run the command 'exit' to terminate the session.
How to create a file in Azure Cloud Shell?
You can create a file in cloud shell using any of the following run command touch or New-Item.
- Syntax 1: touch <filename>
- Example: touch createVM.ps1
- Syntax 2: New-Item <filename>
- Example: New-Item createVM.ps1
How to create a folder in azure cloud shell?
Use the command "mkdir <folder_name>" to create a folder in Azure Cloud Shell.
- Syntax: mkdir <folder name>
- Example: mkdir VirtualMachines
How to change directory in cloud shell?
Use the command "cd <directory_name>" to change directory in Azure Cloud Shell.
- Syntax: cd <directory_name>
- Example: cd VirtualMachines
How to edit a file in Azure Cloud Shell?
Use the command "code <file_name>" to open and edit a file in Azure Cloud Shell.
- Syntax: code <filename>.<extension_name>
- Example: code createVM.ps1
How to run a file in azure cloud shell?
Use the command "./<file_name>" to run an executable file in Azure Cloud Shell.
- Syntax: ./<filename>.<extension_name>
- Example: ./createVM.ps1
How to remove a file in Azure Cloud Shell?
- Syntax: rm <filename>.<extension_name>
- Example: rm createVM.ps1
How to remove directory in Azure Cloud Shell?
Use the command "rmdir <directory_name>" to remove an empty directory in Azure Cloud Shell. To remove a directory and its contents, use "rm -r <directory_name>"
Related Articles:
👉 Install Azure PowerShell and Azure AD PowerShell
👉 How to Find Azure VM Username and Password